(C) 2005 G. Forrest Cook

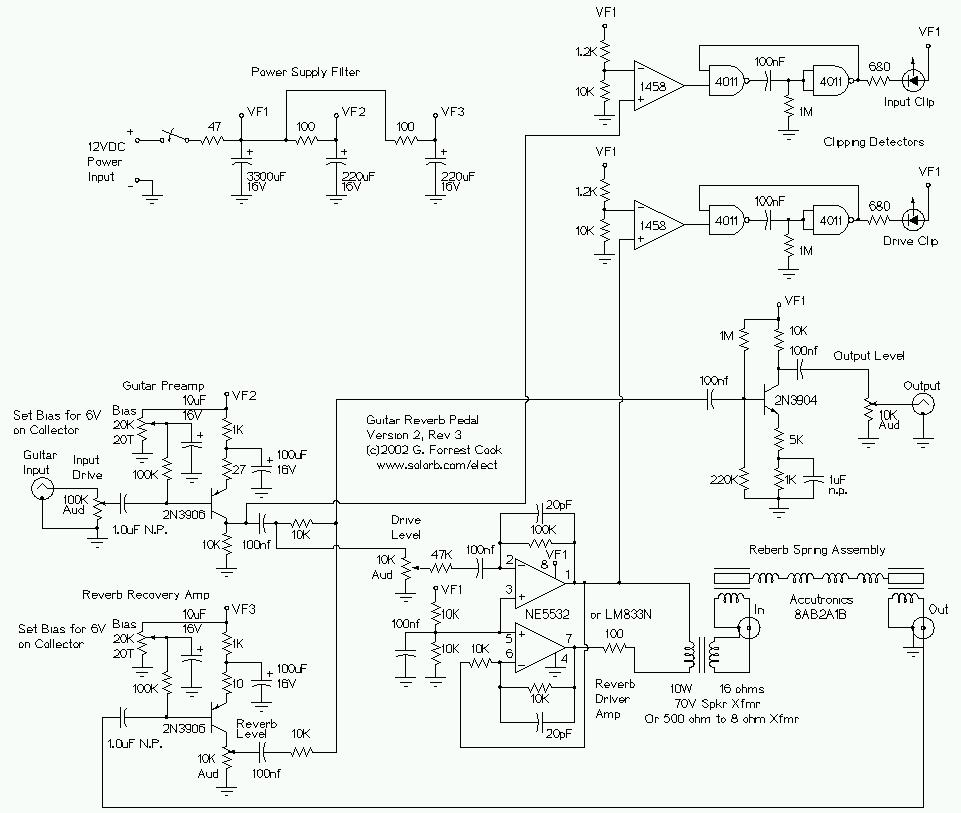
This is my second-generation solid-state guitar reverb circuit. The fidelity is much improved over the earlier design, it is suitable for use as a front-end to a guitar amplifier. This circuit features clipping indicators on the preamp and reverb recovery stages, allowing for the optimal gain settings. A variation of this circuit was used in my Sol-Man solar-powered guitar amp project.
Nominal supply voltage: 12V
Input level: suitable for direct connection to electric guitars.
Output level: line level, can be turned down for feeding a guitar amp.
The guitar input stage is a class A amplifier with adjustable bias. A 2N3906 PNP tranistor is used for a low noise design on this stage. The output of the preamp stage is sent to three places: the output mixer amp, the reverb driver amp, and the input clipping detector.
The reverb driver amp consists of a phase inverting push-pull circuit made from dual sections of a 5532 high quality audio op-amp. This provides a voltage swing of approximate twice the supply voltage to the reverb impedance matching transformer, allowing higher power transfer. The 100 ohm resistor is critical for insuring a clean drive signal, without it, the op-amps can saturate when driving the transformer, producing unwanted distortion.
The transformer matches the impedance of the driver amplifer to the reverb driver coil and allows a dual phase driving signal to power a reverb coil with one grounded side. The transformer is a standard "70 volt" audio line transformer that is often found on PA systems. One reader reported having good results using a Mouser 42TU013 (1K to 8 ohm) transformer. If you can find a reverb tank with a high impedance driver coil, the transformer may be eliminated, the driver coil will require isolation from ground.
The output of the reverb tank is sent to the reverb recovery amp, it is also a 2N3906 class A low noise stage.
The mixer amplifier is a 2N3904 transistor biased for class A operation. It mixes the dry signal from the input preamplifer with the wet signal from the reverb recovery amp through two 10K resistors. The wet signal level is adjusted by a 10K potentiometer.
The clipping detector stages receive inputs from the guitar preamp and the reverb recovery amp, they act in an identical manner. The 1458 op-amp is wired as a comparator with a threshold that is near the high side of the allowable voltage swing on the associated 2N3906 preamp stage. If the transistor output exceeds this voltage, the 1458 output turns on, causing the 4011 one-shot pulse stretcher circuit to fire. The one-shot circuit activates the LED, and stays on long enough that even minor clipping on the amplifier causes visible blinking.
The power supply filter involves an RC filter between the DC input and the VF1 power bus. VF1 drives the reverb driver, the output amp, and the clipping circuit. VF2 and VF3 are further filtered with their own RC filters, they provide isolated DC for powering the input preamp and reverb recovery amplifier stages.
I built this circuit using the "dead bug" construction method on a blank sheet of copper PC board material. Gaussmarkov has nicely provided some printed circuit board artwork in Eagle CAD format for the project.
The two 2N3906 stages need to have the bias set manually for the least distortion. With no signal input, adjust each pot so that the corresponding collector is at 6V. You may further tweak this adjustment by observing the amplifier output on a scope, adjust for minimum output distortion with high input levels.
Plug an electric guitar into the input. Adjust the input drive level as high as it will go without causing the input clipping light to activate. Adjust the drive level control to a level below where the drive clipping light activates. Different reverb sounds can be achieved by lowering and raising the reverb drive level. Adjust the reverb level for a nice sounding balance between the dry and reverb sounds. Adjust the output level for the optimum volume level. Now go play some surf music.
Back to FC's Music Circuits page.